In “Setting Up Your Laptop Screen Extender: A Step-by-Step Guide,” you will find all the information you need to effortlessly configure your laptop screen extender. Whether you’re a tech enthusiast or a beginner, this comprehensive guide will walk you through each step, ensuring that you can utilize your laptop’s extended display to its full potential. With clear instructions and helpful tips, you’ll soon be enjoying a larger workspace and enhanced productivity.
Checking System Requirements
Verifying Operating System Compatibility
Before setting up your laptop screen extender, it’s important to ensure that your operating system is compatible. Most modern operating systems, such as Windows, macOS, and Linux, support screen extenders without any issues. However, it’s still a good idea to check the system requirements of your laptop and the screen extender you plan to use to avoid any compatibility issues.
Confirming Graphics Card Capability
Another essential aspect to consider is the capability of your laptop’s graphics card. In order for your laptop to effectively support a screen extender, it should have a graphics card capable of handling the additional display. Most laptops with dedicated graphics cards can easily handle this, but integrated graphics cards may have limitations. Check your laptop’s specifications or consult the manufacturer’s website to confirm the capability of your graphics card.
Ensuring Sufficient Ports and Cables
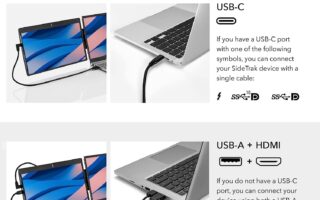
In addition to verifying the operating system and graphics card compatibility, you need to make sure that your laptop has the necessary ports and cables to connect to the screen extender. The most common ports used for this purpose are HDMI, VGA, DVI, and DisplayPort. Ensure that your laptop has at least one of these ports available. If not, you may need to use an adapter or docking station to make the connection possible.
Determining the Type of Screen Extender
Identifying Hardware vs. Software Solutions
When it comes to screen extenders, there are two main types: hardware and software solutions. Hardware solutions involve using physical devices, such as external monitors or projectors, to extend your laptop screen. On the other hand, software solutions allow you to extend your laptop’s display using software applications or services.
Which type you choose depends on your specific needs and preferences. Hardware solutions generally offer better performance and flexibility, while software solutions are often more convenient and cost-effective. Consider your requirements and budget before deciding on the type of screen extender to use.
Understanding Display Connection Types
Before setting up your screen extender, it’s crucial to understand the different types of display connections available. Each connection type has its own advantages and limitations, so knowing which one suits your needs is essential.
-
HDMI: HDMI (High-Definition Multimedia Interface) is the most common connection type used for screen extenders. It provides high-quality audio and video transmission and is widely available on laptops and external monitors. HDMI cables are easy to use and offer excellent picture quality.
-
VGA: VGA (Video Graphics Array) is an older display connection type but is still widely used today. It provides analog video transmission and is found on many older laptops and monitors. VGA cables are often color-coded with blue connectors.
-
DVI: DVI (Digital Visual Interface) is another popular connection type, primarily used for digital displays. It supports both analog and digital signals and offers better picture quality compared to VGA. DVI cables come in different variants, including DVI-I (integrated), DVI-D (digital only), and DVI-A (analog only).
-
DisplayPort: DisplayPort is a versatile display connection type that supports both audio and video transmission. It offers excellent performance and is commonly found on newer laptops and monitors. DisplayPort cables can transmit high resolutions and refresh rates, making it ideal for gaming and multimedia applications.
Exploring Wireless Options
If you prefer a wireless solution for extending your laptop screen, you can explore options such as wireless display adapters or screen mirroring technologies. Wireless display adapters allow you to connect your laptop to an external display without the need for cables. They use technologies like Wi-Fi or Bluetooth to transmit the video and audio signals.
Screen mirroring, on the other hand, enables you to project your laptop screen onto a larger display, such as a TV or projector, using wireless or network connections. This option is especially useful for presentations, streaming content, or sharing media.
When considering wireless options, ensure that your laptop and screen extender support the same wireless technology and have compatible software or drivers.

Preparing the Laptop and External Screen
Selecting the Suitable Screen Size
Before connecting your laptop to an external screen, it’s important to select a suitable screen size based on your needs and available space. Consider factors such as the purpose of the screen extender, the tasks you’ll be performing, and the environment where it will be used. A larger screen size offers more screen real estate and is ideal for multitasking or media consumption, while a smaller screen size may be more practical for portability or space limitations.
Cleaning and Positioning the External Screen
To ensure optimal viewing experience, it’s essential to clean and position your external screen properly. Use a microfiber cloth to clean the screen surface and remove any dust or smudges. Position the screen at a comfortable eye level, ensuring that the top of the screen is at or slightly below eye level. This helps prevent neck strain and fatigue during extended use. Consider using a monitor stand or adjustable arm to achieve the desired positioning.
Configuring Display Settings
Before connecting your laptop and external screen, it’s a good idea to configure your display settings to achieve the desired setup. Access the display settings on your laptop, which can usually be found in the system settings or control panel. Here, you can adjust settings such as screen resolution, orientation, and scaling to match your preferences and ensure a seamless transition between the laptop and external screen.
Connecting the Laptop and External Screen
Connecting via HDMI Cable
Connecting your laptop to an external screen using an HDMI cable is one of the simplest and most common methods. HDMI cables are widely available and provide excellent audio and video quality. To connect via HDMI, simply plug one end of the cable into the HDMI port on your laptop and the other end into the HDMI port on the external screen. Once connected, your laptop should automatically recognize the screen extender and adjust the display settings accordingly.
Using a VGA Cable
If your laptop and external screen have VGA ports, you can use a VGA cable to establish the connection. VGA cables are color-coded with blue connectors and transmit analog video signals. To connect via VGA, plug one end of the cable into the VGA port on your laptop and the other end into the VGA port on the external screen. You may also need to connect a separate audio cable if your VGA cable doesn’t carry audio signals. Once connected, configure the display settings on your laptop to complete the setup.
Utilizing DVI or DisplayPort Connections
DVI and DisplayPort connections offer superior digital video quality compared to VGA. If your laptop and external screen support DVI or DisplayPort, you can use these connections for a high-quality display. DVI cables are available in various variants, so make sure to use the appropriate cable for your specific ports.
To connect via DVI or DisplayPort, plug one end of the cable into the corresponding port on your laptop and the other end into the matching port on the external screen. Depending on your laptop’s graphics settings, you may need to configure the display settings to enable the external screen.
Establishing a Wireless Connection
If you prefer a wireless setup, there are several options available to connect your laptop and external screen without cables. Wireless display adapters, such as those using Wi-Fi or Bluetooth technology, allow you to connect your laptop to an external screen wirelessly. Follow the manufacturer’s instructions to set up the wireless display adapter and establish the connection between your laptop and the screen.
Screen mirroring technologies, such as Miracast or AirPlay, enable you to project your laptop screen wirelessly onto a larger display. Ensure that both your laptop and external screen support the same screen mirroring technology. Access the screen mirroring settings on your laptop and follow the steps to pair and connect with the external screen.
Configuring Multiple Displays
If you want to extend your laptop screen to multiple external displays, you can configure multiple displays in the display settings. Most operating systems allow you to set up multiple monitors, each with different resolutions and orientations. Connect the additional external displays using the appropriate cables or wireless connections, and then access the display settings to configure the arrangement and settings for each display.

Adjusting Screen Resolution and Orientation
Accessing Display Settings
To adjust your screen resolution and orientation, you need to access the display settings on your laptop. In most operating systems, you can find these settings in the system settings or control panel. Look for a section related to display or graphics settings.
Choosing the Appropriate Resolution
Once you’re in the display settings, you can choose the appropriate resolution for your external screen. Higher resolutions offer sharper images and more screen real estate, but keep in mind that your laptop’s graphics card may have limitations. Select a resolution that is supported by both your laptop and external screen for optimal performance and visual quality. If you’re unsure about the best resolution, consult the documentation or website of the external screen manufacturer.
Changing the Screen Orientation
If you prefer a different screen orientation, such as portrait instead of landscape, you can change it in the display settings. This feature is especially useful for tasks like reading documents or coding. Select the desired orientation and check if the external screen supports it. You may need to physically rotate the screen or use the display settings to adjust the orientation accordingly.
Arranging and Extending Displays
Organizing Display Positioning
When using multiple displays, you can organize their positioning to match your preferences. In the display settings, you’ll find options to rearrange the displays based on their physical location. Drag and drop the displays to match their physical arrangement on your desk. This ensures a fluid cursor movement between the displays and a coherent visual experience.
Setting the Primary Display
If you have multiple displays connected, you can choose which one will be the primary display. The primary display is where your laptop’s taskbar, desktop icons, and notifications appear by default. Access the display settings and designate the desired display as the primary one. Keep in mind that this setting can be changed at any time, so feel free to experiment and find the arrangement that works best for you.
Extending or Mirroring the Screens
Depending on your preferences, you can choose to extend or mirror your laptop screen on the external display. Extending the screen allows you to have separate desktops on each display, effectively expanding your workspace. This is useful for multitasking or working with multiple applications simultaneously. Mirroring the screen, on the other hand, duplicates your laptop screen onto the external display, showing the same content on both screens. This is ideal for presentations or sharing content.
In the display settings, you’ll find options to configure the screen mode. Select the desired mode, either extend or mirror, and apply the changes. Experiment with different setups to find the one that suits your needs and workflow.

Configuring Display Preferences
Adjusting Brightness, Contrast, and Color
To enhance your viewing experience, you can adjust the brightness, contrast, and color settings of your external screen. Access the display settings or use the physical buttons on the screen to navigate to the color or picture settings. Here, you’ll find options to adjust the brightness, contrast, saturation, and color temperature according to your preferences. Consider adjusting these settings to match the lighting conditions of your workspace and ensure optimal image quality.
Customizing Display Scaling
When using different screen sizes or resolutions, you may need to customize the display scaling to achieve the desired visual result. Display scaling allows you to increase or decrease the size of text, icons, and other elements on the screen. This is especially useful when using a high-resolution external screen with a small physical size. Access the display settings and look for the scaling or DPI (dots per inch) options. Adjust the scaling to make the content more readable and comfortable for your eyes.
Enabling Night or Reading Mode
Many laptops and external screens offer built-in features to reduce eye strain during prolonged use. Night or reading mode is a display setting that reduces the blue light emitted from the screen, making it easier on the eyes, especially in low-light conditions or at night. Enable this feature in the display settings or through dedicated software applications. Consider using this mode, especially during nighttime or when working for extended periods, to reduce eye fatigue and improve sleep quality.
Troubleshooting Common Issues
Checking Cable Connections
If you’re experiencing issues with your laptop screen extender, such as a blank screen or flickering display, start by checking the cable connections. Ensure that all cables are securely plugged into the respective ports on your laptop and external screen. Sometimes, loose connections can cause display problems. If necessary, disconnect and reconnect the cables to establish a proper connection.
Updating Graphics Drivers
Outdated graphics drivers can often lead to compatibility issues or display problems with your laptop screen extender. It’s essential to keep your graphics drivers up to date to ensure optimal performance. Visit the manufacturer’s website for your laptop’s graphics card or use a driver update utility to check for the latest drivers. Follow the instructions provided to download and install the updated drivers, which can potentially resolve any display-related issues.
Resolving Resolution and Display Problems
If you’re encountering resolution or display problems with your laptop screen extender, there are a few troubleshooting steps you can take. Firstly, verify that your laptops’ graphics settings and the external screen’s settings are aligned regarding resolution and refresh rate. Mismatched settings can result in distorted or unsupported resolutions.
Additionally, try adjusting the resolution or display settings on your laptop to find a compatible configuration. If the desired resolution is not available in the display settings, ensure that the necessary graphics drivers are installed and up to date. In some cases, you may need to use specific software provided by the external screen manufacturer to customize the display settings further.
Ensuring Audio Output on External Display
Setting Default Audio Device
When using an external screen, it’s essential to ensure that the audio output is correctly configured. By default, your laptop may continue to play audio through its own speakers instead of the external screen’s speakers or connected audio devices. Access the audio settings on your laptop and set the external screen or connected audio device as the default audio output. This ensures that the audio is played through the desired source and enhances your multimedia experience.
Configuring Audio Settings
In addition to setting the default audio device, you can further configure the audio settings based on your preferences. Adjust the volume, balance, and equalizer settings to achieve the desired sound quality. Some external screens also offer audio enhancement features, such as virtual surround sound or dialog enhancement. Explore the audio settings on both your laptop and external screen to customize the audio output according to your preferences.
Disconnecting and Reverting to Single Display
Disconnecting and Removing External Screen
When you no longer need to use the laptop screen extender, or if you need to take your laptop on the go, it’s important to disconnect and remove the external screen properly. Depending on the connection type, simply unplug the cable from both your laptop and the external screen. Be gentle when unplugging the cables to avoid any damage or loosening of the ports. If you’re using a wireless connection, disable the wireless display or screen mirroring feature on both devices.
Adjusting Display Settings
After disconnecting the external screen, your laptop will revert to the single display mode. Depending on your laptop’s settings, it may automatically adjust the display settings accordingly. However, it’s a good practice to double-check the display settings to ensure that your laptop’s screen is set as the primary display. Make any necessary adjustments to the display settings based on your preferences.
Remember to power off the external screen or switch it to the appropriate input source if you’re not using it anymore. This helps conserve energy and ensures that your laptop’s resources are directed solely to the built-in display.
In conclusion, setting up your laptop screen extender involves verifying system requirements, determining the type of screen extender, preparing the laptop and external screen, connecting them using appropriate cables or wireless options, adjusting display settings, and troubleshooting common issues. By following these step-by-step instructions and customizing the settings to your preferences, you can efficiently enhance your productivity, experience improved visual quality, and enjoy a larger workspace with the convenience of a laptop screen extender. Happy extending!